Saturday, October 30, 2010

Snail's pace decorating

My family room re-do mission is going slowly, but I am making some progress. So far, I've collected a few items, amongst them...

1. A mirror with a mirrored frame. It's similar to this, but I did NOT pay over 2000 pounds for it, which is the price tag on this one:


I'd been pricing large silver framed mirrors, both online and in numerous shops and they ranged from $250 to the ridiculous price above. Then, when I was shopping for something entirely different, I spotted mine in Lincraft. It was a reasonable-ish $140, but thanks to a special they were running, was marked down to $90. My ideas of scouring op shops for a suitable frame, painting it silver and getting a mirror cut to fit were immediately discarded and I grabbed that baby off the shelf faster than you could blink.

2. A couple of these faux leather cushions, also from Lincraft. THESE were the reason I was in the shop, after I spotted them advertised for $9.99:


3. My potted palm... which I've shown before. That cost me about $40 for pot and plant.


I'm going to add some styrofoam pellets topped with pebbles to hide the black plastic inner pot.

4. Some vintage botanical prints. Well, freebie downloads anyway. I'll have to choose which four I want to use, get them printed to the right size and grab some frames from K Mart or a $2 Shop or somewhere.


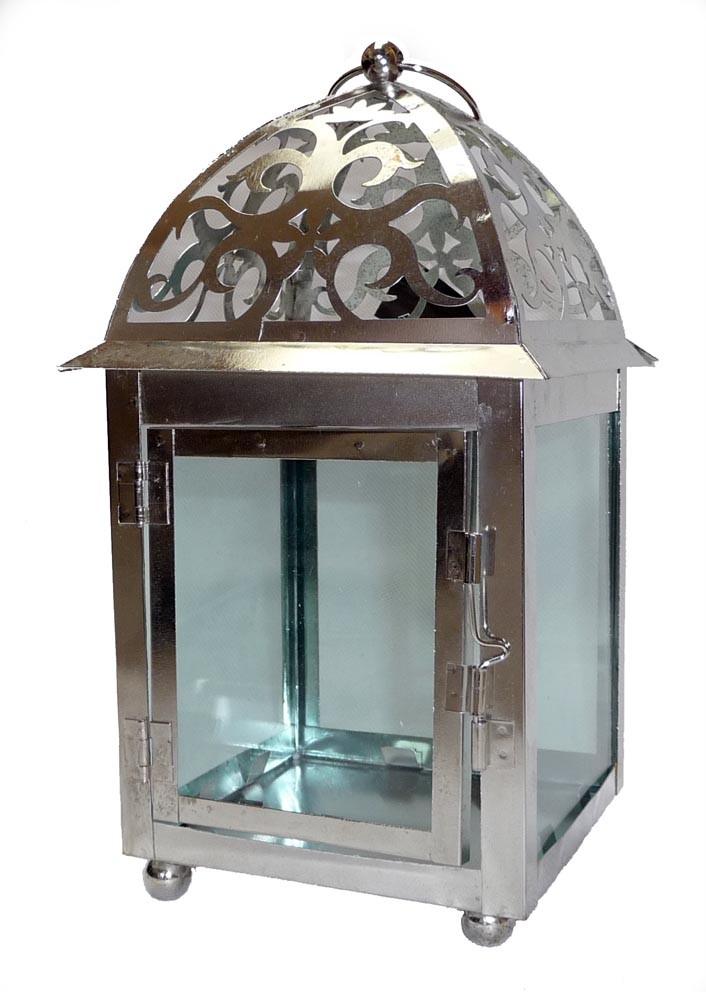
5. A few decorative odds and ends. These, I mostly already had, but I spotted this silver lantern for $9.95 the other day, and plan to grab one in the next couple of days:


I still need one of these:


There seem to be plenty around, but I'm not paying $700 for one. It has to be chocolate, but can be real or faux leather; I'm not fussy. And I prefer one with legs.

I also need something like this to use as a side table, which is going to be much harder than finding an ottoman:


These only come as a set of three, and the price is a bit steep, so I'm still looking (pleeeease help me out, eBay!).

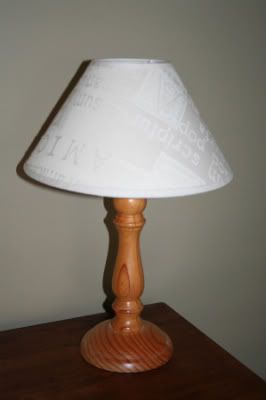
I need to scour all the furniture shops in my area this week while I'm on leave. I'm also planning an expedition to a few fabric places, since I can't seem to find any cushion covers that are remotely like what I want. And the lamp? I decided I didn't like the op shop offering after all, so I'm still sans lamp. I may just go buy one from Freedom after all. ;)

The couch fund is slowly growing. I may be able to think about ordering the thing after Christmas. Fingers crossed.


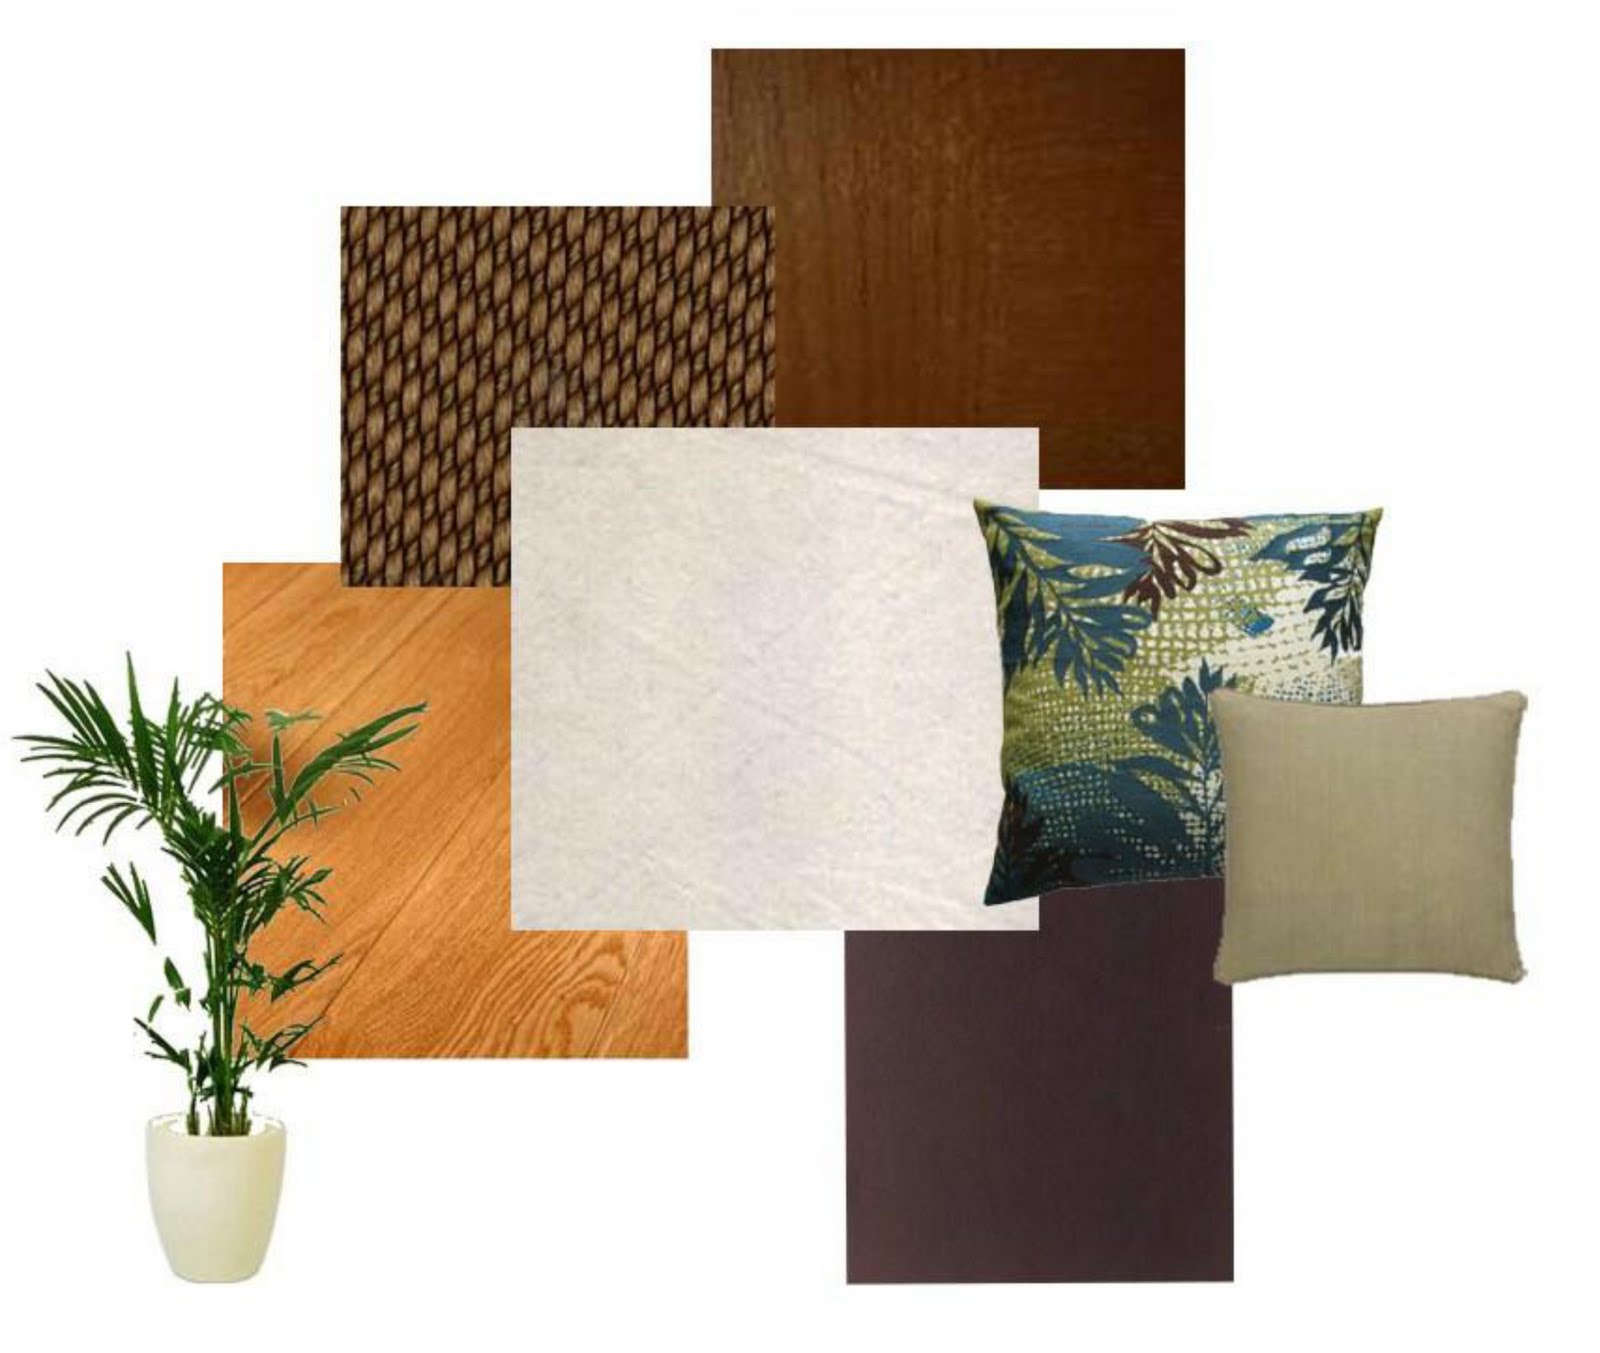
Oh, and here's my inspiration board again, just to show you I'm on the right track...

Sunday, October 24, 2010

Improvising

We spent a lot of time today getting our outdoor entertaining area ready for summer. Bike Boy cleaned the pavers - the horrible wet winter we had this year had caused a lot of nasty green moss/algae to grow on the sandstone. Then there was the accumulation of dirt that blows in and the odd food spill...

I oiled the outdoor furniture and tidied up the garden. After all that work, I decided we need to have a BBQ tonight and spend some time relaxing in our piece of paradise. But we still need some lounge furniture for the alfresco room. So far, I haven't seen anything I like for a price I'm prepared to pay. Well, there was that one eBay bargain, but while I dithered over whether the chairs would fit in my car, someone else bought it.

So I put my thinking cap on and came up with this temporary solution:

Dining setting plus market umbrella - these, we already had. With a coat of oil, the table came up a treat, as usual. The chairs need replacing though. My renovation a year ago made them look like new for a while, but they've faded badly again and the fabric on the backs is starting to tear. I'll have to start looking for replacements.


Lounge furniture required some ingenuity....

One old bench seat (haven't oiled that yet) plus a cheap seat pad from Bunnings plus some cushions collected from various rooms in the house equals a lovely outdoor couch:


For extra seating, two armchairs and a small table we've had forever (which also got a coat of oil) and more cushions:


My "coffee table" is actually three baskets turned upside down. The contents are spread all over the family room floor, but shhh:


Now I'm off to enjoy the space I've created.

Friday, October 22, 2010

Progress, at least outdoors

I've sourced a couple of small items for the family room recently, and have my eye on a few other likely candidates, but that's as far as things have gone with the inside over the past couple of weeks. So there's nothing to report, really. I'm hanging out for Cup week, when I have some leave planned and might actually get something done.

Meanwhile, Spring has finally arrived and the garden is putting on some growth, so at least there's been some progress there. A quick tour:

The kangaroo paws are all flowering madly, making a nice bright splash against the house wall outside my studio.


My succulent garden has put on some amazing growth over winter, and the variety of plants constantly suprise me with flowers at different times. These two are covered with buds about to burst open:


My "jungle" in the corner is growing well and should provide enough shade in a year or two for my giant bird's nest fern. Fingers crossed, anyway.


The scleranthus are still on their mission to take over the world.


The tiger grass may be tattered on the tips from the winter winds and frost, but new shoots are growing like the clappers.


The cannas are throwing up new leaves and this one is even flowering early.


And the herbs have gone completely mental.


The sage...


...and thyme are flowering.


And my parsley, self-sown from seed, is now a beautiful frilly clump. I can never get excited about continental parsley; I much prefer the curly variety.


The Chinese star jasmine around the side is impersonating a Triffid and things are happening in the front yard too, but that's a whole other post.

It's nice to see nature doing its thing.

Tuesday, October 12, 2010

Family room design consultation

As I mentioned before, Kristine of Lemonbutter Furnishings & Interiors did a design consult for our family room. I'm now sloooowly working on finding the furniture and accessories I need to bring her beautiful design to life.

I'm not going to post all the details and pictures from the 20-odd page document, but here's a visual overview -

Inspiration board:

Textiles & textures mood board:


No painting to do (thank goodness), but a couple of big furniture items are required, which was our intention all along. After all, the old couches and the IKEA side table aren't quite the look I was going for.

The crucial part of the whole design is the couch. Which unfortunately is going to cost some big bickies. I did the rounds of furniture shops months ago and I know where I'll get the best deal, but it's still going to be a hefty slug. So saving madly is my priority for now.

Most of the rest, I ought to be able to do on the cheap - Kristine has given me some great suggestions for finding bargains or working a bit of makeover magic. Last weekend I sourced a palm tree and painted a cheap pot to come up with something that looks surprisingly like Kristine's image. (It still needs some pebbles to hide the inner black plastic pot):


Today I spotted a really ugly lamp in an op shop that's a likely candidate for a makeover... I just didn't have any cash on me and they don't take cards, dammit. Let's hope it's still unsold when I can get back there on Thursday.

I have a money-saving plan for the silver-framed mirror ....and the framed prints. If I can track down the perfect fabrics, I can make new cushion covers. I could just go out and buy those smaller things, but that would make a dent in the couch fund, so I'll be doing them on the cheap.

That leaves me a new blind to organise and a few pieces of furniture to find, but I'm being patient(-ish). Don't they say "Good things come to those who wait"?

Sunday, October 10, 2010

A good day's work


I got the bamboo panel stained and sealed - I'd forgotten what a lengthy process it was last time. Stain on the front of the frame, two coats of Ultradeck on both sides of the frame and two coats of clear sealer on the bamboo on both sides. That's a lot of waiting around for paint to dry.

Bike boy added a strip of merbau to the top of the rendered screen which finishes it off nicely. Then he screwed the panel to the merbau capping. I got to hold the ladder, hand screws and drill bits to him and then rearrange the pebbles to get the water feature centred. Voila!


While all that was going on, I was also adding one more coat of paint and the first coat of sealer to my pot cupboard, plus reassembling the door. And then I got very brave and decided to give the top a waxed finish. Now I wonder what on earth I was worried about? Talk about easy...

It's still not finished, so you'll have to wait for photos. Bad luck.

Saturday, October 9, 2010

Today's projects

Today, I have on the go...

- My pot cupboard. Yes, I'm still going. I've been very short on time, so I just slap on some stain or paint or do a little sanding whenever I have a spare half-hour. It might be done by next weekend. Might not, either.

- A plant pot for an indoor palm. I wasn't keen on paying $60+ for a glazed pot, and couldn't find one in the exact colour I wanted anyway. So I bought a cheap terracotta pot instead and I'm doing the seal-and-paint thing, like I did with the herb planters. I'm using one of my mistint $1.50 bargains too, so it's working out exceptionally cheap.

I also had to do a few odds and ends in the garden: apply Seasol and molasses, pull out a few random weeds, sprinkle some snail bait about and trim off the ratty dead bits from some plants. That involved working around Bike Boy, who was connecting up our water feature (another super-cheap find).

Tomorrow's effort will be to stain and seal the bamboo panel we're using as a backdrop, then get it permanently installed - it's just propped up for now, so we could see the effect.


Yes, we will level it up before fixing it in place.

Friday, October 8, 2010

Lamps! What do you think?


Before:


After:


Just a little paint and a new shade, and such an improvement! I'm so glad I went with the black, and the natural linen-look shades are perfect. Not such a hard decision after all. And to think, I almost donated these to charity...

Cost breakdown:

Lamp bases - free. I must have bought them 15 years ago and we had plenty of use out of them as our bedside lamps.
Paint - free. Well, it was from my stash in the garage, so no cost specifically for this project.
Shades - $10 each on sale at K Mart.

$10 per lamp is pretty good in my book. :)

I'm linking to this party.

Sunday, October 3, 2010

When in doubt, call a professional!

I had a vague decorating style in mind when we built the house, but due to taking our time with the purchasing part of the operation, I've found myself getting a bit distracted from my vision. The idea was for a modern look, but with some Balinese/Thai kind of tropical accents. I didn't want a whole lot of heavy carved furniture though, nor did I want a clinical tiled and sparsely furnished look. Yep, I was good at knowing exactly what I didn't want.

I was attracted to a number of different styles and had picked up a few bits and pieces along the way that didn't really fit the modern or tropical genre... and I was worried that what I'd end up with was a mish-mash of styles that just looked all wrong together.

I kind of knew what I wanted to achieve, but couldn't pinpoint the how. Would this work with that? Was I getting too far away from my intended style? The more decorating magazines or blogs I read and the more shops I browsed through, the more confused I got. Aargh!

Then in my blog travels, I stumbled onto The Painted Hive. I loved Kristine's style, not to mention her talent for spotting a treasure in an ugly old piece of furniture and then working her transformation magic on it. I stalked her blog and her eBay auctions for ages, before I finally realised that HERE, right under my nose, was the answer to my decorating problems. Not only does this talented lady offer design consultations, but she's a whiz at helping clients perform miracles on a budget. I remembered what a relief it was to get professional help with the landscaping design... So a quick email was sent to Kristine, begging for help, and before I knew it, I'd hired my own interior decorator.

We met, we chatted, she asked lots of questions and took lots of photos and notes - and now I have A Plan (yes, with capital letters) for our family room. One that I know will actually work. No more worrying about buying things, then finding that they just don't work with the other furniture and "stuff" we have.

I won't be rushing straight out and buying everything I need to achieve the look though. Some of the items on my list will take some work to track down - only because I don't have a budget of squillions, so will be keeping an eye out for bargains and most likely transforming them with a bit of paint and elbow grease.

This will be a work in progress, but I know it's going to be worth it. Next I have Kristine working on the lounge...


Friday, October 1, 2010

Ahead of schedule

Just got this finished and moved back into the bedroom...and in the nick of time too, because I could not have stood ONE MORE MINUTE of having my clothes strewn all over the bedroom floor.


That's a custom colour, a mix of chestnut and cedar stains and some black tint. I just splashed a bit of this and a bit of that into a container till it looked about right, then started painting. It turned out pretty well.

The handles...hmm. I couldn't find exactly what I wanted - I was after something ornate, but not too ornate. Then after sleeping on it, I did an about-face and decided that the chest really needed something pretty simple. So these black cast iron knobs won out:


Yes, it's a little distressed. *ahem* That wasn't deliberate, it's just how it turned out. The drawers may be solid pine, but the top and sides are ply, and will only stand up to a little sanding. So there may have been a little of the old polyurethane finish left behind....

There's a story behind the "custom" colour.I actually began using the leftover stain from the bedside tables, which I renovated back in March. Only problem was, it was one of those stain and sealer all in one products. I didn't buy it because it was cheaper though (even though I am cheap). It was because I couldn't get the colour I wanted in a straight stain. What I didn't know was that there are chemicals added to those two-in-one products to get them to dry. And that once the can is opened, if you don't use it all within a few weeks, the chemicals evaporate and you're left with a sticky, nasty mess that simply will not dry.

I learned this after painting one coat and cursing the next day because it was still gooey. Aargh! Cue stripping and sanding and another trip to Bunnings to hunt for a colour that would more or less match the bedside tables. Of course, I didn't find one, so I made my own.

Let's hope the next project is less of a drama.

Still going....

It's been a busy week, and I've had to work on my projects in very short bursts. The lamp bases are finished, the tallboy is ready for its new handles (and boy, am I ready to get all my clothes off the bedroom floor!Aargh!), but the pot cupboard hasn't got beyond stripping - and there's even a bit of work to still be done there.

I should have some photos this weekend... :)