Showing posts with label DIY. Show all posts

Saturday, October 5, 2013

Reloved furniture project: Vintage pot cupboard

I wonder if anyone actually remembers this "little" project from a long, long while back? It turned out to be a bit of a bugger of a job, and I lost patience and put it aside. So it sat in the garage under a pile of bike bits, old newspapers and goodness knows what else for quite some time. But finally, a few weeks ago, I dragged it out and decided to get it finished. So, ta-dah.....!!

Just the thing when you need a bit of extra serving space for afternoon tea or dessert.

Pretty blue Toile paper lining for the shelves.
But let's back up a bit.... remember how it started? I warn you, this may hurt your eyes...

Eek!!

Phew, that's better!
It required some serious work to get through the silver leaf and umpteen coats of different coloured paint. Heavy-duty stripper was called into service. Then the sanding began. And more sanding. And yet more sanding. I admitted defeat in the end and decided to prime and paint the body of the cabinet, which meant that I only had to get all the damn paint off the top surface. 

Here's a lovely shot of the paint stripper in progress. Nice.


White, pink, purple, silver.... the horrors inflicted on this poor little cabinet would make you weep.
I originally decided to paint the cabinet charcoal - but I just wasn't happy with the result. Commence sulking and three years of ignoring the piece altogether.

This time around, I painted it antique white. It's not a style that goes with my decor, but I'm going to sell it anyway, so it was a commercial decision: French provincial, shabby, country and Hamptons styles are all very popular and white cabinets with gleaming natural timber tops fit right in with all of those styles. 

It turned out quite well in the end - there are some small defects in the top, but I'm calling them "character". Some walnut stain and a waxed finish has that hardwood glowing.

Hmm, yes, that's better.

One more horrendous flashback: Oh. My. GOD.
I'm pleased with the result - it will make a nice side table, bedside cabinet, drinks cupboard or extra space in the dining room to put your fabulous cake. :)


It'll be listed on eBay next week some time. Fingers crossed somebody loves it and takes it home, after all the work I put into it.

Thursday, September 5, 2013

Not dead yet

Wow, it's been a long time. I'm probably talking to myself by now... Well, you know, life gets busy and things slow down on the home front when you've been in your house for a while, so there hasn't been a lot to blog about.

I have a few updates which I do plan to get around to posting. I'm working through a small list of projects at the moment, some of which aren't all that interesting, but there are a couple that I think are worth sharing.

Meanwhile, remember the vintage dressing table I picked up on eBay a while back? I had a plan for that, which involved my eldest son moving out and my turning his room into a guest room/music room/extra storage space. Unfortunately, the moving out part still hasn't happened, so I've had it sitting around since I restored it, not quite sure what to do with it. I love it, but we really don't have the perfect place for it. So I'm reluctantly selling it. :(

It makes a lovely hall table - but we already have one of those.

It's listed on eBay now - the auction ends tomorrow, so if anyone is interested, you might want to hop over there and bid. I'm just saying. :)

I'll be back with some more interesting updates soonish. There's my DIY framed artwork that cost me around $50, when I've seen similar things retailing for $500+. And I'm back working on my pot cupboard, after a couple of years of lost motivation. Stay tuned.


Sunday, January 8, 2012

Shame on me!

I have a shameful admission: I've been on holidays for two weeks now and have not done a single one of the projects I've had lined up for months.

My eBay coffee table is still sitting in the alfresco room waiting to be stripped, sanded and refinished before being installed in its new home in the lounge.

Meanwhile, it's a handy addition to our outdoor room.

The daybed is sadly in need of that seat pad I've been going to make. The "temporary" cushions I threw on it back in September are still there.

Hmm. Not quite the look I wanted.


Our outdoor furniture languishes in the sun, in desperate need of a couple of coats of oil.

Thank goodness for quality timber; it doesn't look too shabby.

The garden screens all want a coat of oil or sealer (not bad after almost two years...).

A little discolouration appearing.

Nothing some Ultradeck can't fix

"That" pot cupboard is still in the garage, waiting for a do-over of the paint job that didn't work out the way I envisaged.

I know it's under there somewhere.

The laundry and my walk in robe are both so embarrassingly untidy that I'm not even going to show you a photo. No, I haven't yet trekked down to IKEA for some storage solutions...

And it's now the 8th day of the New Year and our Christmas tree hasn't even been packed away. I'm avoiding that job because there is zero fun in it.

If I leave it up much longer, it'll be Christmas 2012!

On the other hand, I have watched a ton of DVDs, read a couple of books, had my hair done, watched a good chunk of the mega-exciting Australia vs India 3rd test match, slept, shopped, been to the theatre and generally relaxed.

So I guess my holidays haven't been a complete waste of time then. :)

Saturday, November 12, 2011

There's no place like home

We arrived home yesterday from a lovely two-week holiday in Thailand. We saw some amazing sights, ate fabulous food and spent almost half of our time there lazing around in the paradise on earth that is Krabi.

Ao Phra Nang, Krabi - a photographer's paradise, just a short walk from our hotel

In spite of having had a wonderful time, I'm happy to be home, and feeling grateful for many things, such as:

- The absence of smelly drains
- The relative peace and quiet of my neighbourhood (apart from that damn dog barking from over the back fence!)
- The lack of humidity. I truly love Melbourne's mostly dry summer...
- The order and tidiness of the streetscape around here. No rubbish, no piles of sandbags, no broken-up footpaths or drain covers, no mould covering buildings, no cars, motorbikes and street vendors parked all over pedestrian thoroughfares.

I think I even missed the noisy clamour of the cockatoos and corellas squawking every morning and evening.

We're not holiday shopaholics, and were on a reasonably tight budget, but we did pick up a few pretty things to decorate the house, including:

Silk fabric, Chiang Mai
Hand-painted silk cushion covers, Chiang Mai
Block prints on rice paper, Bangkok
Hill Tribe silver necklace, Chiang Mai
I won't be wearing the necklace - although it's beautiful, my preferred style in jewellery is far more delicate. Instead, I plan to mount it on black fabric, frame it and hang it on the wall. I've seen similar framed pieces for sale here, priced at around $700. I paid 250 baht (less than $8) for this, and if I DIY the framing, total cost should be under $50.

I also picked up a few ideas for furniture and decorative accents. Unfortunately, carting home heavy teak furniture was a no-no. The shipping costs were a bit high, and the fumigation process to satisfy our quarantine laws cost as much again. But I'll be keeping an eye out on eBay and cheap import shops for things with the right "feel".

It might take me a while to get our souvenirs sorted, but I'll post some updates along the way.

Sunday, September 4, 2011

Progress

Three coats and a light sand between:


And I've managed to change the eBay photo into a format that will work with Blogger. So here's the "Before":


It doesn't show quite how badly weathered it was - some of the joins had opened up, but after three coats of oil, the timber has expanded and closed up the gaps quite a bit. I'm going to leave it (under cover, of course) for six months to allow the oil to really penetrate, then oil it again. After that, a yearly treatment should keep it in good condition.

In case you're wondering what I used....

We're huge fans of the Intergrain range of products. They're water-based, low-odour and Australian made. I used Nature's Timber Oil on this, in a clear finish. It nourishes the timber and brings out the natural colour, but you can get tinted versions as well. It smells strongly of eucalyptus, rather than some of the stinkier products around that smell strongly of mineral oils.

Saturday, November 27, 2010

DIY Outdoor bar


I posted a few photos of our new outdoor bar on Facebook, and both Bike Boy and I have shown them around at work as well. The feedback from women has been very complimentary, but the mens' reactions have unanimously been along the lines of "Wow! Hmm, where could I fit one of those in my back yard?" So I thought I'd share a few details of the construction process, in case anyone cares to have a go at something similar.

I can't take credit for any of this project - it's all the work of my husband, Bike Boy (aka The Mad Brewer). I did contribute one teensy design detail, and do the timber finishing work on the counter top, but the rest was all his hard work.

We had the bulk of our landscaping professionally done in February-March this year. We didn't fancy laying 70-odd square metres of paving, or constructing planter boxes and so on, because we're just too time-poor (and frankly, waaay too old for this crap now. Funny how these things never seemed a big deal when we were in our twenties). Our budget was limited though, so some of the things we wanted to include had to be put into the "do it later" pile. An outdoor bar for our BBQ area was one of those things. But finally, the time had come to do something about that particular project...

The bar was built in two sections - once finished, it was incredibly heavy, so it was easier to build the two pieces of the "L" and then move them into place before joining them up and attaching the counter top, all done using galvanised brackets. I don't have many photos, unfortunately, since I was at work while most of the construction was going on.

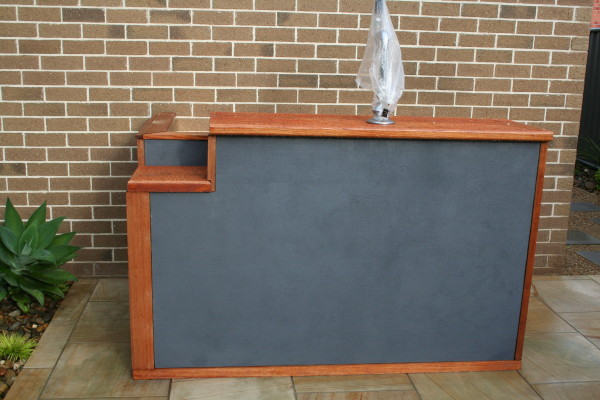
The photo below shows the main section. The frame is treated pine, the cladding on the front blueboard (heavy!) and the end piece a sheet of ply. The counter top is made from two pieces of kiln-dried hardwood. Luckily my brother-in-law has mad woodworking skillz (and all the necessary tools) and was able to biscuit-join the pieces, then get busy with his router, to create a nice rounded edge.


The counter top was given two coats of Merbau stain, to match our timber feature screens. Then I got stuck into it with my sandpaper and clear outdoor sealer to give it a beautiful smooth finish that would withstand the weather.


The ply end-piece and some trim strips were also stained to match. You can see the shorter section of the "L" lying on the ground to the right there.


Before attaching the counter tops or any trim pieces, the blueboard was painted with Dulux Acratex, a textured finish that looks like render, but without all the mixing of cement and so on. This is messy stuff to work with! We had it tinted to match our Colorbond Ironstone spouting etc, which is the same colour we had the landscapers use on the rendered section of our feature screen. The render effect was my sole contribution to the design. :)

Nice match:


The inside has space for ice-filled eskies (that's coolers for most of the English-speaking world...), one to hold bottled drinks, and one for a keg of home-brewed beer. There's a spot for the essential gas bottle and a slops bucket, and some shelving will be added to hold glasses at some point in the future.


Brother-in-law came to the rescue again with some stainless steel he had left over from his kitchen renovation, which was used for a small splashback:


I must have done a good job of sealing that timber - it's been raining for days, and look how it's repelling water (be sure to admire the beautiful colour and grain while you're at it):


The built-in beer tap may seem a bit grand to some, but they obviously don't live with a brewing crazy craftsman... At our old place, we had a custom-built shed at the bottom of the yard. As well as providing storage, this was Bike Boy's brewery - he'd salvaged our old laundry sink, kitchen breakfast bar and fridge after we renovated, and had a nice little setup down there. He'd fitted a Guinness tap to the door of the fridge and kept his kegs in there. He actually drilled a hole through the side of the fridge to run a gas line to the keg, so all he had to do when he wanted a drink was grab a glass - No need to even open the door.

When we moved house, the beer fridge had a bit of a mishap and it gave up the ghost shortly after we settled into our rental. That was a sad day... So a crucial part of the bar design was a built-in tap. The local home brew shop owner sourced a font (the upright bit), and Bike Boy was able to resurrect the Guinness tap once more, and voila!


That's my almost 15-year-old, having a fun time playing barman. He's drinking Coke, in case you're wondering; the Bulmer's is mine.

There are a few finishing touches to add still - I've filled nail holes in the trim pieces, and need to give them one more coat of stain and then two coats of sealer. Unfortunately, I've been sick all week, and now that I'm feeling better, it's pouring rain. Hopefully there'll be a break in the weather so I can get it done before the big party...

Our old kitchen bar stools have been re-purposed and work beautifully out here - they need to be sanded, re-stained and then sealed with an outdoor product, but that can wait till after Christmas when I have holidays scheduled. Meanwhile, we'll just keep them under cover when they're not in use. The bonus is, I got to go shopping yesterday for new stools for our breakfast bar. Yay!


I'm linking this post to Remodelaholic's Friday link party:


Saturday, November 20, 2010

Ready to party!


When I said we were adding a bar to our al fresco area, I meant a serious bar.

Bars, buying and bidding

Bike Boy has a biiiiiig project going on at the moment. Somebody has a significant birthday coming up very soon, and there's a party planned. And what does every outdoor entertaining area need for parties? Why, an outdoor bar, of course!

I'm telling you, this thing is the mother of all bars. I'm about to go sand and seal the countertop, which is my only contribution to the project - apparently this is a MAN job! Then there's a beer tap and a stainless steel splashback to be installed and some finishing touches to do, and voila! Hopefully tomorrow evening we'll be giving it a test run. I'll post photos when it's all done.

In other news, I think I may have found my couch for the family room. Hallelujah! I was browsing around Nick Scali yesterday and they've slashed all their leather lounge suite prices. I was going to go for fabric, but I figure that if I can get leather for $1,000 off the normal price, I'd be crazy not to.

If I can get that thing in place, I can finally add all my other bits and have the room looking half-decent. I'm also bidding on something on eBay that would be perfect as a side table, so cross your fingers and toes for me...

:)

Tuesday, October 12, 2010

Family room design consultation

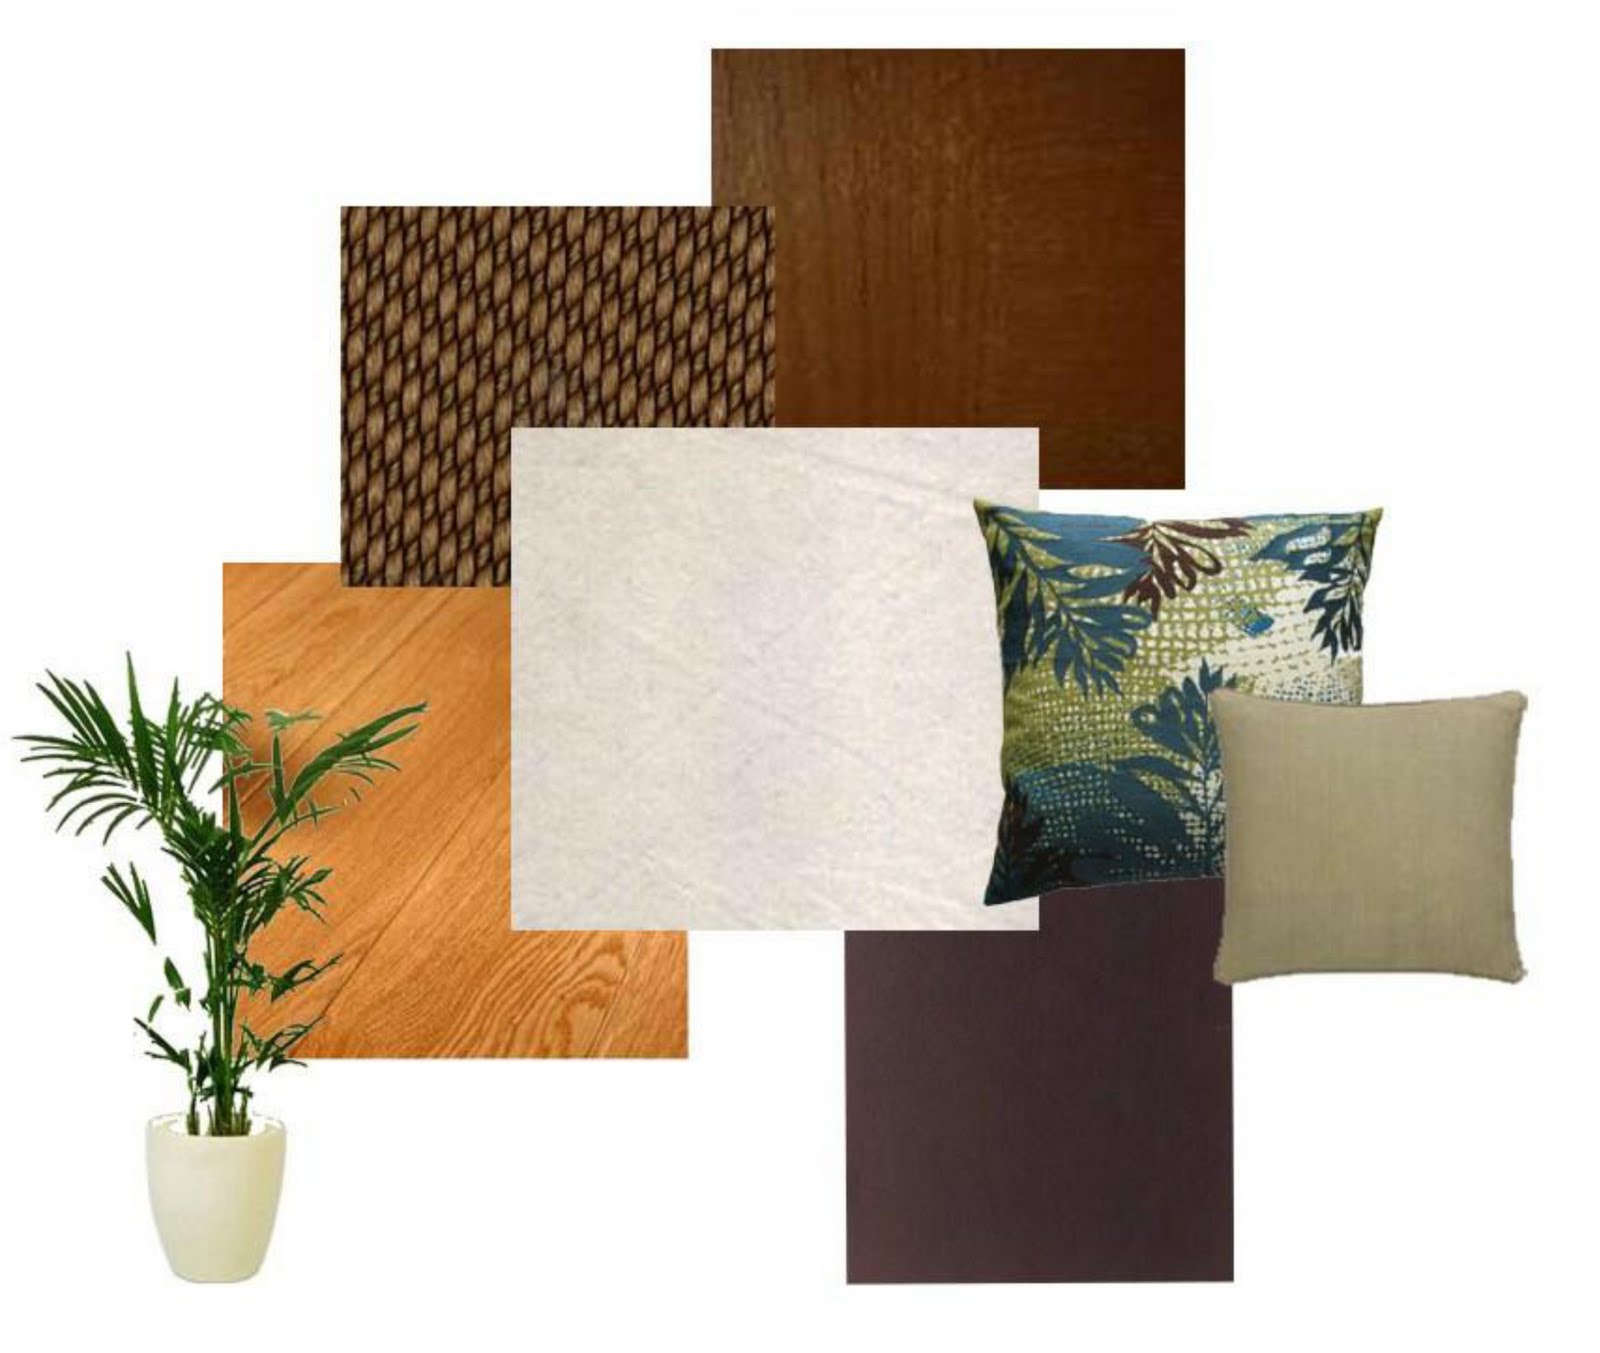
As I mentioned before, Kristine of Lemonbutter Furnishings & Interiors did a design consult for our family room. I'm now sloooowly working on finding the furniture and accessories I need to bring her beautiful design to life.

I'm not going to post all the details and pictures from the 20-odd page document, but here's a visual overview -

Inspiration board:

Textiles & textures mood board:


No painting to do (thank goodness), but a couple of big furniture items are required, which was our intention all along. After all, the old couches and the IKEA side table aren't quite the look I was going for.

The crucial part of the whole design is the couch. Which unfortunately is going to cost some big bickies. I did the rounds of furniture shops months ago and I know where I'll get the best deal, but it's still going to be a hefty slug. So saving madly is my priority for now.

Most of the rest, I ought to be able to do on the cheap - Kristine has given me some great suggestions for finding bargains or working a bit of makeover magic. Last weekend I sourced a palm tree and painted a cheap pot to come up with something that looks surprisingly like Kristine's image. (It still needs some pebbles to hide the inner black plastic pot):


Today I spotted a really ugly lamp in an op shop that's a likely candidate for a makeover... I just didn't have any cash on me and they don't take cards, dammit. Let's hope it's still unsold when I can get back there on Thursday.

I have a money-saving plan for the silver-framed mirror ....and the framed prints. If I can track down the perfect fabrics, I can make new cushion covers. I could just go out and buy those smaller things, but that would make a dent in the couch fund, so I'll be doing them on the cheap.

That leaves me a new blind to organise and a few pieces of furniture to find, but I'm being patient(-ish). Don't they say "Good things come to those who wait"?

Sunday, October 10, 2010

A good day's work


I got the bamboo panel stained and sealed - I'd forgotten what a lengthy process it was last time. Stain on the front of the frame, two coats of Ultradeck on both sides of the frame and two coats of clear sealer on the bamboo on both sides. That's a lot of waiting around for paint to dry.

Bike boy added a strip of merbau to the top of the rendered screen which finishes it off nicely. Then he screwed the panel to the merbau capping. I got to hold the ladder, hand screws and drill bits to him and then rearrange the pebbles to get the water feature centred. Voila!


While all that was going on, I was also adding one more coat of paint and the first coat of sealer to my pot cupboard, plus reassembling the door. And then I got very brave and decided to give the top a waxed finish. Now I wonder what on earth I was worried about? Talk about easy...

It's still not finished, so you'll have to wait for photos. Bad luck.

Saturday, October 9, 2010

Today's projects

Today, I have on the go...

- My pot cupboard. Yes, I'm still going. I've been very short on time, so I just slap on some stain or paint or do a little sanding whenever I have a spare half-hour. It might be done by next weekend. Might not, either.

- A plant pot for an indoor palm. I wasn't keen on paying $60+ for a glazed pot, and couldn't find one in the exact colour I wanted anyway. So I bought a cheap terracotta pot instead and I'm doing the seal-and-paint thing, like I did with the herb planters. I'm using one of my mistint $1.50 bargains too, so it's working out exceptionally cheap.

I also had to do a few odds and ends in the garden: apply Seasol and molasses, pull out a few random weeds, sprinkle some snail bait about and trim off the ratty dead bits from some plants. That involved working around Bike Boy, who was connecting up our water feature (another super-cheap find).

Tomorrow's effort will be to stain and seal the bamboo panel we're using as a backdrop, then get it permanently installed - it's just propped up for now, so we could see the effect.


Yes, we will level it up before fixing it in place.

Friday, October 8, 2010

Lamps! What do you think?


Before:


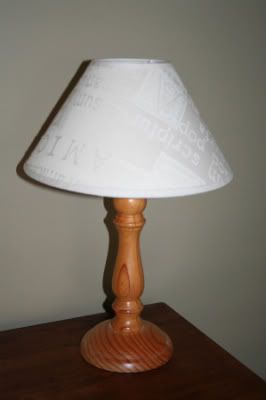
After:


Just a little paint and a new shade, and such an improvement! I'm so glad I went with the black, and the natural linen-look shades are perfect. Not such a hard decision after all. And to think, I almost donated these to charity...

Cost breakdown:

Lamp bases - free. I must have bought them 15 years ago and we had plenty of use out of them as our bedside lamps.
Paint - free. Well, it was from my stash in the garage, so no cost specifically for this project.
Shades - $10 each on sale at K Mart.

$10 per lamp is pretty good in my book. :)

I'm linking to this party.

Friday, October 1, 2010

Ahead of schedule

Just got this finished and moved back into the bedroom...and in the nick of time too, because I could not have stood ONE MORE MINUTE of having my clothes strewn all over the bedroom floor.


That's a custom colour, a mix of chestnut and cedar stains and some black tint. I just splashed a bit of this and a bit of that into a container till it looked about right, then started painting. It turned out pretty well.

The handles...hmm. I couldn't find exactly what I wanted - I was after something ornate, but not too ornate. Then after sleeping on it, I did an about-face and decided that the chest really needed something pretty simple. So these black cast iron knobs won out:


Yes, it's a little distressed. *ahem* That wasn't deliberate, it's just how it turned out. The drawers may be solid pine, but the top and sides are ply, and will only stand up to a little sanding. So there may have been a little of the old polyurethane finish left behind....

There's a story behind the "custom" colour.I actually began using the leftover stain from the bedside tables, which I renovated back in March. Only problem was, it was one of those stain and sealer all in one products. I didn't buy it because it was cheaper though (even though I am cheap). It was because I couldn't get the colour I wanted in a straight stain. What I didn't know was that there are chemicals added to those two-in-one products to get them to dry. And that once the can is opened, if you don't use it all within a few weeks, the chemicals evaporate and you're left with a sticky, nasty mess that simply will not dry.

I learned this after painting one coat and cursing the next day because it was still gooey. Aargh! Cue stripping and sanding and another trip to Bunnings to hunt for a colour that would more or less match the bedside tables. Of course, I didn't find one, so I made my own.

Let's hope the next project is less of a drama.