Saturday, November 27, 2010

DIY Outdoor bar


I posted a few photos of our new outdoor bar on Facebook, and both Bike Boy and I have shown them around at work as well. The feedback from women has been very complimentary, but the mens' reactions have unanimously been along the lines of "Wow! Hmm, where could I fit one of those in my back yard?" So I thought I'd share a few details of the construction process, in case anyone cares to have a go at something similar.

I can't take credit for any of this project - it's all the work of my husband, Bike Boy (aka The Mad Brewer). I did contribute one teensy design detail, and do the timber finishing work on the counter top, but the rest was all his hard work.

We had the bulk of our landscaping professionally done in February-March this year. We didn't fancy laying 70-odd square metres of paving, or constructing planter boxes and so on, because we're just too time-poor (and frankly, waaay too old for this crap now. Funny how these things never seemed a big deal when we were in our twenties). Our budget was limited though, so some of the things we wanted to include had to be put into the "do it later" pile. An outdoor bar for our BBQ area was one of those things. But finally, the time had come to do something about that particular project...

The bar was built in two sections - once finished, it was incredibly heavy, so it was easier to build the two pieces of the "L" and then move them into place before joining them up and attaching the counter top, all done using galvanised brackets. I don't have many photos, unfortunately, since I was at work while most of the construction was going on.

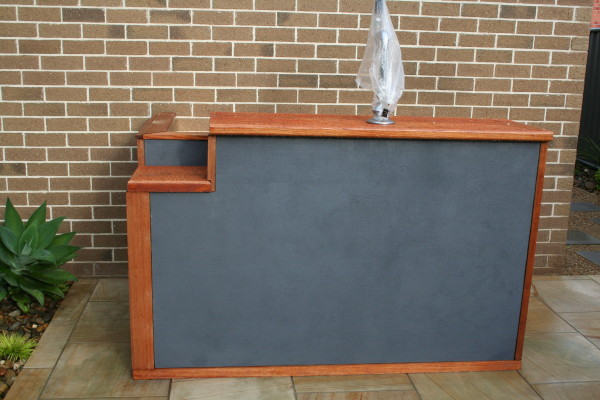
The photo below shows the main section. The frame is treated pine, the cladding on the front blueboard (heavy!) and the end piece a sheet of ply. The counter top is made from two pieces of kiln-dried hardwood. Luckily my brother-in-law has mad woodworking skillz (and all the necessary tools) and was able to biscuit-join the pieces, then get busy with his router, to create a nice rounded edge.


The counter top was given two coats of Merbau stain, to match our timber feature screens. Then I got stuck into it with my sandpaper and clear outdoor sealer to give it a beautiful smooth finish that would withstand the weather.


The ply end-piece and some trim strips were also stained to match. You can see the shorter section of the "L" lying on the ground to the right there.


Before attaching the counter tops or any trim pieces, the blueboard was painted with Dulux Acratex, a textured finish that looks like render, but without all the mixing of cement and so on. This is messy stuff to work with! We had it tinted to match our Colorbond Ironstone spouting etc, which is the same colour we had the landscapers use on the rendered section of our feature screen. The render effect was my sole contribution to the design. :)

Nice match:


The inside has space for ice-filled eskies (that's coolers for most of the English-speaking world...), one to hold bottled drinks, and one for a keg of home-brewed beer. There's a spot for the essential gas bottle and a slops bucket, and some shelving will be added to hold glasses at some point in the future.


Brother-in-law came to the rescue again with some stainless steel he had left over from his kitchen renovation, which was used for a small splashback:


I must have done a good job of sealing that timber - it's been raining for days, and look how it's repelling water (be sure to admire the beautiful colour and grain while you're at it):


The built-in beer tap may seem a bit grand to some, but they obviously don't live with a brewing crazy craftsman... At our old place, we had a custom-built shed at the bottom of the yard. As well as providing storage, this was Bike Boy's brewery - he'd salvaged our old laundry sink, kitchen breakfast bar and fridge after we renovated, and had a nice little setup down there. He'd fitted a Guinness tap to the door of the fridge and kept his kegs in there. He actually drilled a hole through the side of the fridge to run a gas line to the keg, so all he had to do when he wanted a drink was grab a glass - No need to even open the door.

When we moved house, the beer fridge had a bit of a mishap and it gave up the ghost shortly after we settled into our rental. That was a sad day... So a crucial part of the bar design was a built-in tap. The local home brew shop owner sourced a font (the upright bit), and Bike Boy was able to resurrect the Guinness tap once more, and voila!


That's my almost 15-year-old, having a fun time playing barman. He's drinking Coke, in case you're wondering; the Bulmer's is mine.

There are a few finishing touches to add still - I've filled nail holes in the trim pieces, and need to give them one more coat of stain and then two coats of sealer. Unfortunately, I've been sick all week, and now that I'm feeling better, it's pouring rain. Hopefully there'll be a break in the weather so I can get it done before the big party...

Our old kitchen bar stools have been re-purposed and work beautifully out here - they need to be sanded, re-stained and then sealed with an outdoor product, but that can wait till after Christmas when I have holidays scheduled. Meanwhile, we'll just keep them under cover when they're not in use. The bonus is, I got to go shopping yesterday for new stools for our breakfast bar. Yay!


I'm linking this post to Remodelaholic's Friday link party:


Tuesday, November 23, 2010

Slowly does it

I've picked up another item for my family room - I wasn't all that confident that I'd actually find just the thing, but eBay helped me out once again.

This was the side table/chest from Kristine's inspiration board:


I knew it was a concept and that I didn't have to find that exact thing, so I was prepared to look at all sorts of alternatives. I looked and I looked and I couldn't find anything I liked. Until I saw this on a furniture website and got all excited:


The price nearly made me choke though, so I filed away the photo and kept looking. *sigh*

Finally, I spotted the perfect thing on eBay. Only thing was, the seller had a set of three and was offering them as a single lot. I figured that if I couldn't find a use for the other two, I could always sell them, so I lined up my bid, waited for my moment and....SOLD! This baby is now mine:


The timber is a little scratched, but I can fix that. The latch is also a bit skew-wiff, but nothing that can't be fixed with a pair of pliers (or possibly a hammer).

My only issue is that the bamboo is too green for my liking, so I'll have a go at staining it and see what happens....

Monday, November 22, 2010

My piece of tropical paradise

When we were planning our landscaping, I decided I wanted a gorgeous, lush, resort-style garden with a tropical feel. That led to a lot of research, hunting for plants that would give me the look I wanted, but which would stand up to Melbourne's winter. Most real tropical plants were ruled out straight away, because they don't like frost and cold winds, but I wasn't giving up.

Eventually I came across an online article - I think it was from the ABC's Gardening Australia TV show - that featured the gardens of the elephant walk at Melbourne zoo. They listed a whole lot of plants that would give that tropical feel, without being prima donnas about the climate. I also spent a lot of time looking around nurseries and stalking gardens that I liked the look of to come up with some ideas.

I did most of the planting between March and May, and six months later, it's all coming along very nicely.

By the way, I've completely forgiven the cannas for being all ratty during winter. In the past four weeks they've redeemed themselves in a big way....


Saturday, November 20, 2010

Ready to party!


When I said we were adding a bar to our al fresco area, I meant a serious bar.

Bars, buying and bidding

Bike Boy has a biiiiiig project going on at the moment. Somebody has a significant birthday coming up very soon, and there's a party planned. And what does every outdoor entertaining area need for parties? Why, an outdoor bar, of course!

I'm telling you, this thing is the mother of all bars. I'm about to go sand and seal the countertop, which is my only contribution to the project - apparently this is a MAN job! Then there's a beer tap and a stainless steel splashback to be installed and some finishing touches to do, and voila! Hopefully tomorrow evening we'll be giving it a test run. I'll post photos when it's all done.

In other news, I think I may have found my couch for the family room. Hallelujah! I was browsing around Nick Scali yesterday and they've slashed all their leather lounge suite prices. I was going to go for fabric, but I figure that if I can get leather for $1,000 off the normal price, I'd be crazy not to.

If I can get that thing in place, I can finally add all my other bits and have the room looking half-decent. I'm also bidding on something on eBay that would be perfect as a side table, so cross your fingers and toes for me...

:)

Wednesday, November 10, 2010

Beating the heat

We had a real problem with our west-facing sliding door on the studio. In summer it was unbearable in the afternoons - even with blockout Roman blinds and the evaporative cooling running.

We were originally going to build a pergola outside to provide shade, but there's a major drama in the form of a sewer easement, which means that getting a permit is unlikely. So we thought maybe a shade sail - as a bonus, that can be taken down in winter to let the sun in for some natural light and heating.

After getting some quotes and doing some extra research this week, we've decided on a folding arm awning instead. This sort of thing:

Now you see it


Now you don't


No posts, no permits required, and it folds out of sight in winter when we want the sun to shine in. We'll be ordering it tomorrow so we can have it made to order and installed before Christmas.

Now that a decision's been made, I can finally finish off the strip of garden out the back.