Tuesday, September 28, 2010

D.I.Y. A.D.D.

I probably should finish one thing before starting on another. But, you know... there's all that time spent waiting. Waiting for paint stripper to work, for stain to dry, etc, etc.... Besides, I get bored easily. Must have a short attention span.

So I have three projects on the go at the moment.

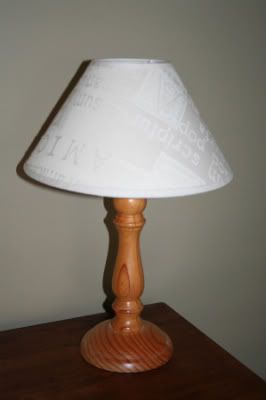
1. Lamps. So far, the bases have been primed and painted matte black. I need to give them a coat or two of satin poly, I think they're turning out OK:


2. The tallboy. This has been a bit more time-consuming than expected, but it's coming up well. I may not have it finished till next weekend now; there just aren't enough hours in my days. Sanded and stained - might give it a wipe over with black tint before sealing. Hmm...


Can I call it "vintage"? I bought in in 1981 or thereabouts. ;)

3. This was an unexpected bonus. I was trying to buy this vintage pot cupboard a few weeks back on eBay and was outbid. I shrugged and figured another would turn up sometime. Then yesterday, I got a second chance offer. Yippee! The seller described this thing as "a bit of a mess" and I knew it would take some work to strip, and boy, was I right!


I don't know who committed these atrocities, but first it had been painted white......then pale pink....then purple (looks like they ran out of paint before finishing that)...


....then had silver leaf applied...


...and some black spray paint around a leaf stencil on one side.


I don't know if the greeny-blue is another layer of paint, or if it's just the result of a reaction between the paint, silver leaf and the chemicals in the stripper. Whatever, most of it is off now, but I still have some work to do. This was about an hour after applying a nice thick layer of Citristrip:


The cabinet itself is in pretty good condition - one small hole in the door has been filled, and other than that, there are a few minor dents and chips that just add character. The door latch and hinges may need to be replaced, but that's no big hurdle.

Stay tuned.

Saturday, September 25, 2010

Indecisive? Ask the internet!

I have a pair of lamps that were retired from duty in our bedroom some time ago - they work perfectly, but they just didn't suit the look of our new abode. I did try to sell them online a couple of times, but nobody was interested. Poor unwanted lamps. :(

I almost donated them to charity last month, along with a pile of other stuff, but something made me haul them back out of the box and hang onto them. So now I'm thinking of giving them a makeover. This is what they look like:


The base is a very simple turned timber design; pine with a clear satin finish. The shade is an off-white jacquard fabric featuring Latin words. I have a strong feeling that these babies can be transformed into something more up to date. But what?

French Provincial with a shabby finish? Black gloss? Metallic finish? Something altogether different that I haven't thought of? And what about the shade? Is it salvageable or do I have to replace it?

I don't know whether I even want to keep them, so selling them is an option. I just want to do something with them that will result in somebody saying "Wow. I love those lamps."

So I'm asking the internet for help. If you have any suggestions, let me have 'em. I don't care whether you're a makeover veteran, or have no skills at all - if you have an idea, I want to hear it. Please. :)

Wednesday, September 22, 2010

What's next?

I'm afraid I have no fabulous furniture "saves" to share this week. I have plenty of jobs-in-waiting to attend to though, so it's not like I'll have nothing to do. (Besides, if I adopt one more poor bedraggled thing and bring it home to live in the garage, I may well find myself divorced.)

Instead I'm going to write myself a list (because I love lists) and start working through some of the makeovers and re-dos that are just lying around waiting patiently for attention.

Job #1 is the pine tallboy in our bedroom. I bought it before we were married, so it's practically ancient. It's still in good nick, but the clear finish is just blah. So it's getting a nice dark stain and satin sealer plus new drawer knobs to match the bedside tables I re-did months ago.


#2 is a pair of cheap robe inserts that we bought when we moved into our first home. Pine-fronted drawers, with chipboard sides and top - not exactly stylish. I'm thinking of covering the units with wallpaper, if I can find just the thing at a good price, and then painting or staining the drawer fronts. They may live in our walk in robes where nobody sees them except us, but who says they can't be pretty?


#3 is the mirror that used to hang above the buffet. Did I forget to mention that I picked up a bigger one, with a woven water hyacinth frame? Here 'tis:


The old one has a lovely bevelled edge and is in a timber frame that I like the style of - it's just the wrong colour for our bedroom where it now resides. Some stain will soon fix that.


#4 is the laundry.... eesh. That's a bit of a big job.


*slams the door shut quickly*

That lot ought to keep me occupied for a couple of weekends. Of course, I was just reading the local paper and there are a few garage sales this coming weekend that might be worth a look....

Friday, September 17, 2010

Vintage dresser - before and after

Who would have guessed that this would turn out to be so easy-peasy? From bedroom dressing table to living room drinks cabinet, and all done in a few days with no dramas at all.

Here's what my eBay bargain looked like before:


The photo doesn't show just how bad the finish was. Numerous coats of shellac had bubbled and peeled or been scratched away. And those handles - ugh. You already know the saga of the unorthodox mirror removal method, so I'll skip that.

Sanding was pretty easy, the old finish came off with no probs. Except around those pretty curvey carved bits.


Some chemical paint stripper helped, but in the end I decided not to be a perfectionist about it. There was also this to deal with:


Mmm. Lovely 70s brown and mustard Contact, firmly stuck down to the drawer bottoms. I tried to peel it off one drawer and ended up with broken off pieces and gunky sticky crap still on the drawer base. Then I had a brainwave - my craft heat gun might do the trick! It did; that nasty stuff just peeled away.

Next I gave her two coats of walnut stain, left over from the chair...


...some satin poly...


...and she was looking just gorgeous. Then I added some new teardrop pulls, which is what the original handles would have been:


Look at that gorgeous cedar!


Sorry about the flash glare. I must fiddle around with my camera settings and perfect the art of indoor photography sans flash. One of these days.

I've just thrown some "stuff" on the top, but this is the general idea for our drinks cabinet. The grog we most often use is on top, and the rest stashed underneath. The basket is temporary - I have a plan for a vintage crate to hold the extra bottles, but that's a whole other story.


This is another bargain I picked up this week - a silverplate footed dish from an antique/secondhand shop near my office. The classic and so-heavy-it-would-break-your-wrist decanter behind it was a wedding gift.


My $2 Shop tray is doing a brilliant job of keeping the bottles and glasses tidy. It was white with a horrible butterflies and flowers print on the bottom, complete with corny poem, but a quick spray with black paint and a coat of wipe-on polyurethane sealer fixed that.


And inside the drawers? No putrid Contact anymore, just a wine rack I found at K Mart, plus a shallow basket to hold corkscrews, openers and assorted bits and pieces.


Happy? You bet.


I'm linking this post to Miss Mustard Seed's Furniture Feature Friday

Furniture Feature Fridays

Thursday, September 16, 2010

Squeeee!!

I'm really excited about how well my vintage dresser is coming up. It turned out to be made of cedar, so for $26.50 it was an absolute steal. I expect to have it finished tomorrow and in its new home on Saturday.

Here's a sneak peek of the progress...

Before:


(Not quite) after:


As you can see, I gave up trying to remove all of the old finish from the carved details. It won't matter though, it all adds to the character. Well, that's my story, and I'm sticking to it!

As for what I'm going to use it for... Well, this old dressing table is about to become a unique drinks cabinet. Details will be posted, I promise.

Sunday, September 12, 2010

Vintage chair - before and after

I thought this would be a simple and quick restoration project for a beginner, but it turns out that chairs have so many surfaces that they take FOREVER to strip, sand, stain and finish. I've been pressed for time lately too, so this "quick" job turned into a three-week epic.

Anyway, without further ado, here she is:


We think this kitchen chair dates from the 1930s. It was originally painted white, but at some point was repainted with several coats of lovely poo-brown. Ugh.

I love how the timber literally glows. I'm soooo in love with this chair.:


I probably should have just put this baby next to its unrenovated twin and photographed them for a comparison...but I'm so knackered after working all day on another reno job that I can't be bothered going out to the garage to get it. I can upload these photos without getting up from my chair, so here you go....

Ugly brown chipped paint:


Stripped and sanded (Victorian Ash? Looking at the legs, my brother in law thinks maybe messmate?):


Stained (lovely colour, but dull, dull, DULL):


And again, the finished product. Two coats of stain, four of Danish Oil and two of satin polyurethane:


I haven't bothered with any styling for my after photo either, because: a) I'm too tired; and b) I'm really crap at it anyway. Hey, you get what you get.

The chairs were a steal at $10.50 for the pair from eBay. I haven't started chair #2 yet, because it needs a repair to one leg first and I'm going to need some help with it.

That's OK, I have plenty of other things to work on in the meantime.


Linking this to Miss Mustard Seed's Furniture Feature Friday.

Furniture Feature Fridays

Saturday, September 11, 2010

P.S.

Also? This afternoon I got to spend some time with Kristine from The Painted Hive. I probably talked her ear off, the poor thing, but she was lovely and full of brilliant ideas.

More on that later!


The best-laid plans

This morning I headed off on an expedition waaaay across the other side of town to collect something I won in an eBay auction - this lovely old dressing table:


I was attracted to its nice clean lines - it oozes early 20th century Australian "no nonsense" design. Except for these gorgeous little scroll embellishments on the raised thingummie on the back (Can you tell I'm not up with vintage furniture terminology?):


The original drawer pulls have been replaced with hideous square plastic knobs, but that's easily fixed. The finish - most likely shellac - is in poor condition, but that's fine since I plan to sand it back and refinish it anyway. The timber looks to be in pretty good condition overall and the drawers don't stick, although a bit of soap on the runners to smooth out the action won't go astray.

I have plans to use this as a living room side table/storage piece, so I won't be needing the mirror. No worries, thinks I, I'll just remove it along with its supports and sell it on eBay. Realising that it wasn't going to fit in my little hatchback as is, I asked the seller how the mirror was attached, so I could make sure I arrived with the right tools to detach it. Here's the bit where things went a bit wrong...

The seller wasn't going to be home this weekend but (obviously being a trusting soul) she left the dresser under the back verandah and told me to just go through the side gate, leave the money under the back door and help myself to my purchase. I bribed and cajoled The Baby into coming along for the drive, grabbed a few screwdrivers and an emergency hammer and pair of pliers - just in case - and off we headed on our epic journey.

All went OK until I tried to unscrew the support pieces from the back of the dresser. Those screws had been in place for many decades and were not budging, no way, no how. Aargh! I managed to unscrew the mirror itself, but was left with these bloody great posts sticking up - and no amount of manoeuvering was going to get that thing in the back of my car.

It had taken almost an hour and a half to get there, and I was NOT leaving empty-handed and defeated. I sent The Baby into the unlocked, and no doubt spider-filled shed, while I scoured the verandah cupboards in search of some tools that might help. Desperation and insanity ingenuity prevailed when the only useful thing we could find was.... a hacksaw.

Oh, yes I did: I sawed off the support posts and we crammed that sucker into the car and headed home.